
OG-My Employee Mobile Application Version 1.0.pdf
Operational Guide – My Employee Mobile Application
Operational Guide
Advanced Postal Technology (APT)
FOR
My Employee App
Mobile Application
INDIA POST – APT Page 1 of 40
Operational Guide – My Employee Mobile Application Login
This module enables secure access to the application using multi-factor authentication.
Key Functional Steps:
• Enter User ID and Password.
• Receive OTP on registered mobile number.
• Enter OTP to successfully log in.
• Use 'Forgot Password' option to reset password using OTP verification.
INDIA POST – APT Page 2 of 41


Operational Guide – My Employee Mobile Application Capture Attendance
This module is used for recording daily attendance of the user.
Key Functional Steps:
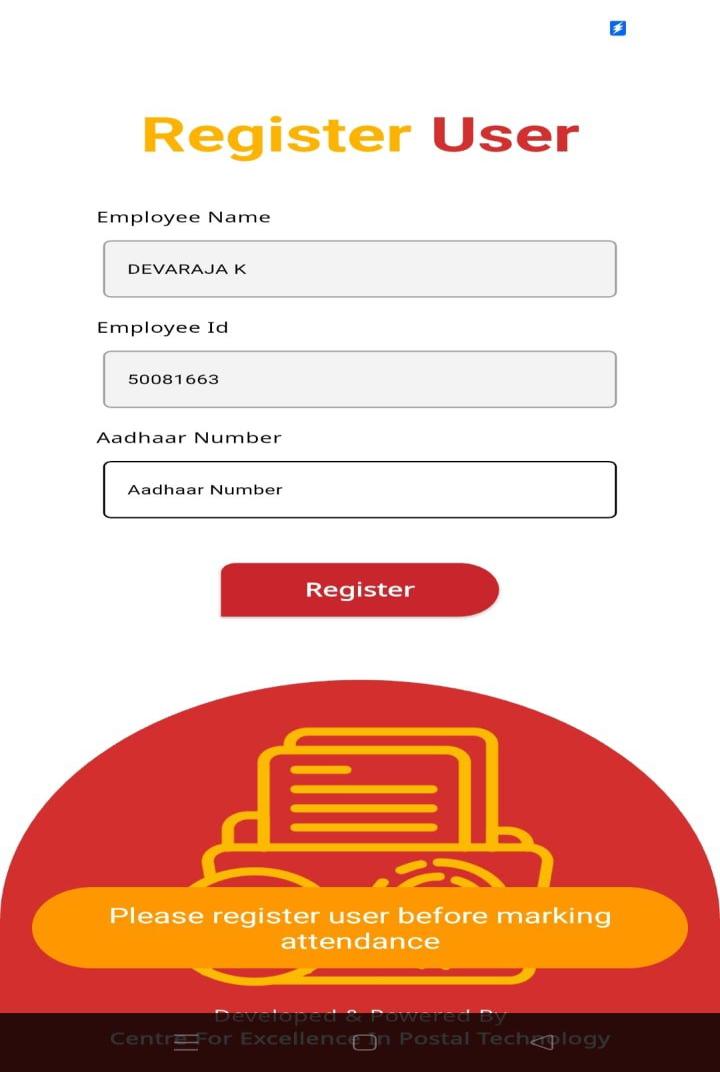
• Complete one-time Aadhaar-based registration using OTP.
• After registration, the user is redirected to the Mark In/Mark Out screen. • Mark In attendance using Aadhaar OTP.
• Mark Out attendance using Aadhaar OTP.
Dependency: Biometric authentication is currently under development. INDIA POST – APT Page 3 of 41

Operational Guide – My Employee Mobile Application Drawer / Menu Bar
Provides access to user profile and related management functionalities. Key Functional Steps:
• Profile: View personal, contact, and posting details along with TRCA level. • Family Details: Add and view family details with approval status tracking. • Communication Details: Modify communication details with approval tracking. • Change Password: Update password securely.
• Logout: Exit the application safely.
Dependency: Family and communication details require approval from the concerned authority.
Screen - Profile Page: This page displays profile details of the user logged in.

UI Elements: This page displays three cards: personal details, contact details and engagement details. On the top it will display employee designation and employee ID and TRCA Level of the employee.
INDIA POST – APT Page 4 of 41
Operational Guide – My Employee Mobile Application
INDIA POST – APT Page 5 of 41

Operational Guide – My Employee Mobile Application Screen - Family Details Page:
∙ This page displays family details of the user logged in.
∙ This page contains two Tabs Family Details and Status.
∙ In the family details tab the Family members details of the Employee are displayed.
∙ The user can also add his family details from this tab. After submitting the family details it will go for approval to the consent authority.
∙ In the status tab it will show the status of the family details that were submitted for the Approval.
INDIA POST – APT Page 6 of 41


Operational Guide – My Employee Mobile Application UI Elements:
➤ Dependent Name*
● Type: Text Field
● Action: Enter dependent name
● Rules:
○ Mandatory
○ Cannot be empty
➤ Gender*
● Type: Dropdown
● Action: Select gender from list
● Rules:
○ Mandatory
➤ PWD Candidate*
● Type: Dropdown
● Action: Select Yes / No
● Rules:
○ Mandatory
➤ Relation*
● Type: Dropdown
● Action: Select relationship (Father, Mother, etc.)
● Rules:
○ Mandatory
➤ Date of Birth*
● Type: Date Picker
● Action:
○ Tap field / calendar icon
○ Select date
● Rules:
○ Mandatory
○ Must be a past date
Operational Guide – My Employee Mobile Application
INDIA POST – APT Page 7 of 41
Operational Guide – My Employee Mobile Application
➤ Marital Status*
● Type: Dropdown
● Action: Select marital status
● Rules:
○ Mandatory
➤ Highest Education Qualification*
● Type: Text Field
● Action: Enter qualification
● Rules:
○ Mandatory
○ Cannot be empty
➤ Employment Status*
● Type: Dropdown
● Action: Select employment status
● Rules:
○ Mandatory
➤ Employee Remarks
● Type: Text Field
● Action: Enter remarks (if needed)
● Rules:
○ Optional
➤ Upload Supporting Document*
● Type: File Upload Component
➤ Upload Button
● Action:
○ User taps Upload
○ Mandatory
○ System opens file picker
○ User selects a file from device
INDIA POST – APT Page 8 of 41
Operational Guide – My Employee Mobile Application
➤File Selection Rules
● Only PDF files are allowed
● Maximum file size: 500 KB
➤ Upload Behavior
● On valid file:
○ File is attached successfully
○ (Optional best practice: show file name or preview)
● On invalid file:
○ Show error:
■ “Only PDF files are allowed”
■ “File size should not exceed 500KB”
INDIA POST – APT Page 9 of 41


Operational Guide – My Employee Mobile Application
➤ Add Button
● Action: Tap to submit it will navigate to the added family members page.
Screen - Added Family List Page:
Display all added family members and allow users to manage them. UI Elements:
➤ Member Details
● Name (e.g., Mahesh)
● Relation (e.g., Child)
➤ Action Icons
Edit Icon
● Action:
○ Tap to edit selected family member
● Behavior:
○ Navigate to Add Family Details screen
○ Pre-fill all existing data
● After update:
○ Return to list
○ Show updated details
Delete Icon
● Action:
○ Tap to delete selected member
INDIA POST – APT Page 10 of 41
Operational Guide – My Employee Mobile Application ➤ Add More Button
● Action:
○ Navigate to Add Family Details screen
● Purpose:
○ Add another family member
➤ Submit Button
● Action:
○ Submit all added family members
● Behavior:
○ Validate list is not empty
○ Send all family data to backend
➤ On Successful Add (from previous screen)
● New member appears in list
● List updates dynamically
➤ On Edit
● Updated data replaces old entry in list
➤ On Delete
● Item removed immediately
➤ On Submit Success
● Show message:
○ “Family details submitted successfully”
● Navigate to the dashboard.
➤ On Submit Failure
● Show:
○ “Submission failed. Please try again”
Operational Guide – My Employee Mobile Application
INDIA POST – APT Page 11 of 41
Operational Guide – My Employee Mobile Application
Screen - Communication Details Page:

Tab: Contact Details
● Purpose: View and update user’s communication and address information
● Mode:
● Initially read-only
● Editable after tapping Modify
UI Elements: (All fields are read only initially, Editable after tapping Modify)
➤ Mobile Number*
● Type: Text Field
● Action:
○ View / edit mobile number
● Validation:
○ Mandatory
○ Must be valid 10-digit number
INDIA POST – APT Page 12 of 41
Operational Guide – My Employee Mobile Application
➤ India Post Email ID
● Type: Text Field
● Action:
○ View / edit official email
● Validation:
○ Must be valid email format
➤ Personal Email ID
● Type: Text Field
● Action:
○ View / edit personal email
● Validation:
○ Must be valid email format
➤ Address Line 1*
● Type: Text Field
● Action:
○ View / edit address
● Validation:
○ Mandatory
○ Cannot be empty
➤ Address Line 2*
● Type: Text Field
● Action:
○ View / edit address
● Validation:
○ Mandatory
➤ Address Line 3*
● Type: Text Field
● Action:
○ View / edit address
● Validation:
○ Mandatory
Operational Guide – My Employee Mobile Application INDIA POST – APT Page 13 of 41
Operational Guide – My Employee Mobile Application
➤ Aadhaar Reference Number*
● Type: Text Field
● Action:
○ View / edit Aadhaar reference number
● Validation:
○ Mandatory
○ Numeric format (as per rules)
➤ PAN Number*
● Type: Text Field
● Action:
○ View / edit PAN number
● Validation:
○ Mandatory
○ Must follow PAN format (e.g., ABCDE1234F)
➤ PIN Number*
● Type: Text Field
● Action:
○ View / edit PIN number
● Validation:
○ Mandatory
○ Numeric format (as per rules)
➤ Employee Remarks
● Type: Text Field
● Action: Enter remarks (if needed)
● Rules:
○ Optional
➤ Upload Supporting Document
● Type: File Upload Component
Operational Guide – My Employee Mobile Application
➤ Upload Button
● Action:
○ User taps Upload
INDIA POST – APT Page 14 of 41○ Optional
○ System opens file picker
○ User selects a file from device
➤ File Selection Rules
● Only PDF files are allowed
● Maximum file size: 500 KB
➤ Upload Behavior
● On valid file:
○ File is attached successfully
○ (Optional best practice: show file name or preview)
● On invalid file:
○ Show error:
■ “Only PDF files are allowed”
■ “File size should not exceed 500KB”
➤ Submit Button
● Action:
○ Submit Communication details
● Behavior:
○ It will be enabled only after successful verification of the mobile number through OTP.
○ Validate list is not empty
○ Send Communication details to the backend for Approval.
➤ Cancel Button
● Action:
○ Cancels modify action.
● Behavior:
○ Return to read only state.
Operational Guide – My Employee Mobile Application INDIA POST – APT Page 15 of 41
Operational Guide – My Employee Mobile Application


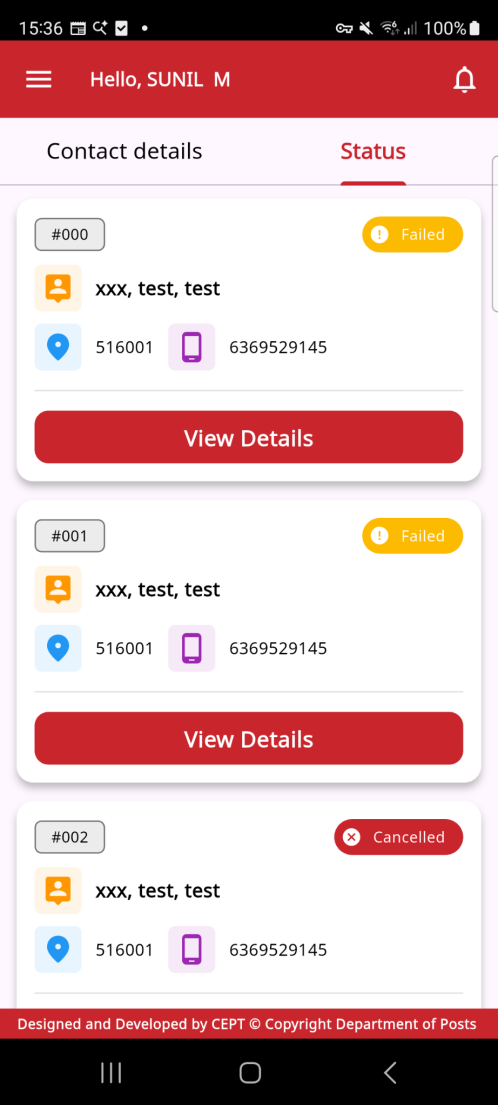
Tab: Status
This Tab displays communication details submitted by the user for approval UI Elements:
➤ View Details Button
● Action:
○ View submitted details
● Behavior:
○ On Tap will show a bottom sheet with the added / Modified details
INDIA POST – APT Page 16 of 41
Operational Guide – My Employee Mobile Application
INDIA POST – APT Page 17 of 41
Operational Guide – My Employee Mobile Application TRCA
Allows users to generate TRCA Slips.
Key Functional Steps:
Step 1: User clicks on "TRCA" icon from the Home Dashboard
Step 2: TRCA Slip page opens with Employee ID (auto-filled), Select Year dropdown, Select Month dropdown, and "Generate PaySlip" button
Step 3: User selects Year from dropdown
Step 4: User selects Month from dropdown
Step 5: User clicks "Generate PaySlip" button
Step 6: Loading indicator displayed while fetching payslip
Step 7: TRCA Slip displayed in PDF viewer showing employee details, earnings, deductions, and net pay
Step 8: User can download PDF to device (Optional)
Step 9: User clicks Back button to return to TRCA Slip page (can generate another slip). Step 10: User clicks Back button to return to Home Dashboard
INDIA POST – APT Page 18 of 41
Operational Guide – My Employee Mobile Application

INDIA POST – APT Page 19 of 41
Operational Guide – My Employee Mobile Application
Leave Management
The Leave Dashboard serves as the central navigation hub for all leave-related activities. It provides quick access to key leave management features through clearly labeled tiles. Users can apply for leave, cancel existing leave, view the holidays list, check leave reports, and access charge reports — all from a single screen.
Dependency: Leave requests must be approved by the authorized officer.
1. Open the Leave Dashboard from the main menu.

2. The dashboard displays the following five feature tiles — select the appropriate tile based on your requirement:
3. Tap Apply Leave (Blue tile) to navigate to the leave application form and submit a new leave request.
4. Tap Cancel Leave (Orange tile) to navigate to the cancel leave page and cancel a previously applied leave.
5. Tap Holidays List (Brown tile) to view the list of Closed and Restricted holidays applicable to your circle.
6. Tap Leave Report (Green tile) to view leave records within a specified date range. 7. Tap Charge Report (Red tile) to view and download charge-related records for relinquished or assumed duty assignments.
8. After completing the required action in any sub-page, return to the Leave Dashboard to access other features as needed.
INDIA POST – APT Page 20 of 41
Operational Guide – My Employee Mobile Application
The Apply Leave page allows employees to submit leave requests by selecting leave type, dates, and providing necessary details such as reason, contact information, and leave location. It also supports options for adding prefix/suffix dates, handling holidays, and assigning a substitute if required. Once all mandatory fields are filled, the request can be submitted for approval.


1. Open the Apply Leave screen from the menu
2. Check available Leave Balances
3. Select Leave Type from dropdown
4. Choose From Date
5. Choose To Date
6. (Optional) Select Prefix Date
7. (Optional) Select Suffix Date
8. (Optional) Select Intermediate Holidays
9. Verify No. of Days (auto-calculated)
10. Enter Reason for Leave
11. Select checkbox if Headquarters Permission required
12. Enter Phone Number
13. Enter Leave Station
14. Enter Address Line
15. Choose with Substitute OR Without Substitute
a. If With Substitute selected:
b. Select Division
c. Select Substitute
d. Verify substitute details
16. Click Submit
INDIA POST – APT Page 21 of 41
Operational Guide – My Employee Mobile Application Cancel Leave:
The Cancel Leave page allows employees to view their pending or approved leave requests by selecting a date range. Users can identify specific leave applications and cancel them if eligible. The system updates the leave status after successful cancellation.


1. Open the Cancel Leave page from the menu.
2. Select Pending Leaves or Approved Leaves tab.
3. Choose From Date and To Date to filter records.
4. View the list of leave applications displayed.
5. Identify the leave you want to cancel.
6. Click on the Cancel button for that leave.
7. Confirm the cancellation if prompted.
8. The system validates the request.
9. Leave is cancelled successfully and status is updated.
10. If no records are found, select the proper date range and retry. INDIA POST – APT Page 22 of 41
Operational Guide – My Employee Mobile Application Charge Report:
The Charge Report page allows users (teachers/staff) to view and manage charge-related records for duty assignments that have been relinquished or assumed as substitute. It displays application details including the number of days and current CR Status (e.g., Pending). Users can also download charge reports for a specific date and session.


1. Open the Charge Report page from the main menu.
2. Two main tabs are available at the top — select Relinquish Report to view relinquished charge records or Assume Report to view assumed charge records.
3. Below the tabs, select either Relinquish on Substitute or Assume as Substitute based on the requirement.
4. The Application Details table displays records with columns: Date, Days, CR Status, and Action.
5. Review the listed records and check the CR Status column — a status of Pending indicates the record is yet to be approved or processed.
6. To download a specific record, click the Download (↓) icon in the Action column against the desired entry.
7. A "Download Charge Report" dialog box appears — tap the calendar icon in the Date field and select the required date.
8. In the Session dropdown, select the appropriate session (e.g., Morning, Afternoon).
9. Click the Download button to download the charge report for the selected date and session.
10. To cancel the download, click the Close button.
11. If the download does not proceed, verify that both Date and Session fields are correctly filled and retry.
INDIA POST – APT Page 23 of 41
Operational Guide – My Employee Mobile Application Holidays:
The Holidays List page allows users to view all official holidays applicable to their circle (e.g., Karnataka Circle). It is categorized into Closed Holidays and Restricted Holidays. The list displays holiday details including the Serial Number, Holiday Date, Day, and Occasion. Users can also search for specific holidays using the search bar.
1. Open the Holidays List page from the main menu.
2. Two tabs are available at the top — select Closed Holidays to view mandatory holidays, or Restricted Holidays to view optional/restricted holidays. 3. The page displays the holiday list specific to the user's assigned circle. 4. The list shows records with the following columns: Sl. No., Holiday Date, Day, and Occasion.
5. Scroll down to view the complete list of holidays.
6. To search for a specific holiday, type the holiday name or date in the Search Holidays search bar at the top of the list.
7. The list filters and displays matching records based on the entered search text.
8. If no results appear after searching, verify the spelling or try a different keyword.
9. Review the holiday details — Date, Day of the week, and the corresponding Occasion name.
10.Once done reviewing, click the Close button at the bottom to exit the Holidays List page.

INDIA POST – APT Page 24 of 41
Operational Guide – My Employee Mobile Application Leave Report:
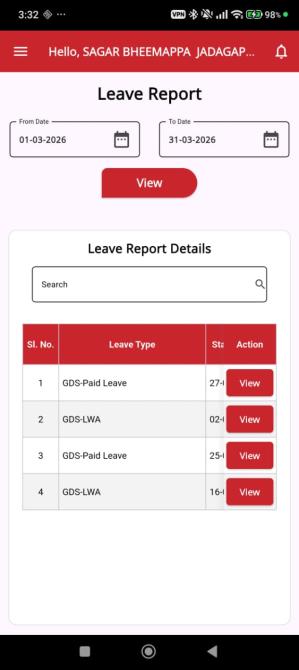
The Leave Report page allows users to view their leave records within a specified date range. Users can filter records by selecting a From Date and To Date, then fetch the results using the View button. The report displays leave details including Leave Type and Start Date. Users can also view individual leave record details and search within the results.
1. Open the Leave Report page from the main menu.
2. In the From Date field, tap the calendar icon and select the start date of the report period.
3. In the To Date field, tap the calendar icon and select the end date of the report period.
4. Click the View button to fetch leave records for the selected date range. 5. The Leave Report Details table is displayed with the following columns: Sl. No., Leave Type, Start Date, and Action.
6. Review the listed records showing leave types such as GDS-Paid Leave, GDS LWA, etc.
7. To search for a specific leave record, type a keyword in the Search bar above the table.
8. The list filters and displays matching records based on the entered search text.
9. To view complete details of a specific leave record, click the View button in the Action column against the desired entry.
10. If no records are displayed after clicking View, verify that the selected date range is correct and retry.
11. If no results appear after searching, verify the keyword or clear the search to reset the list.
INDIA POST – APT Page 25 of 41
Operational Guide – My Employee Mobile Application
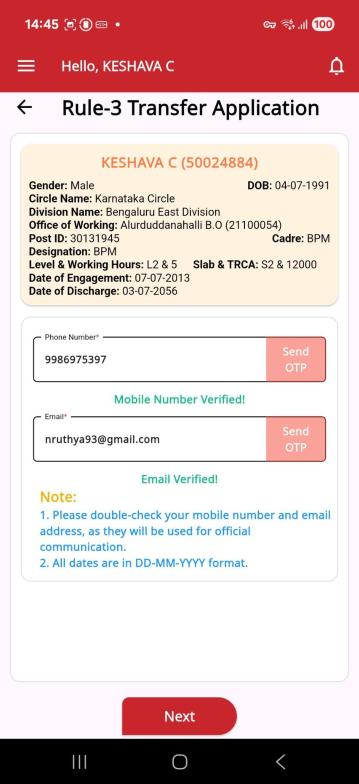
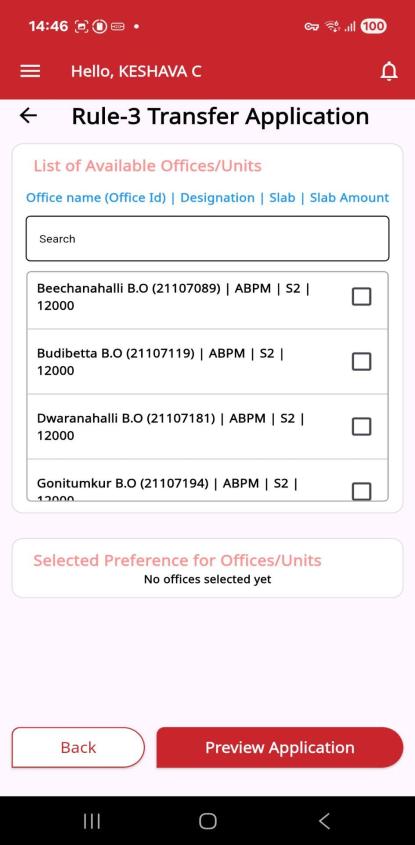
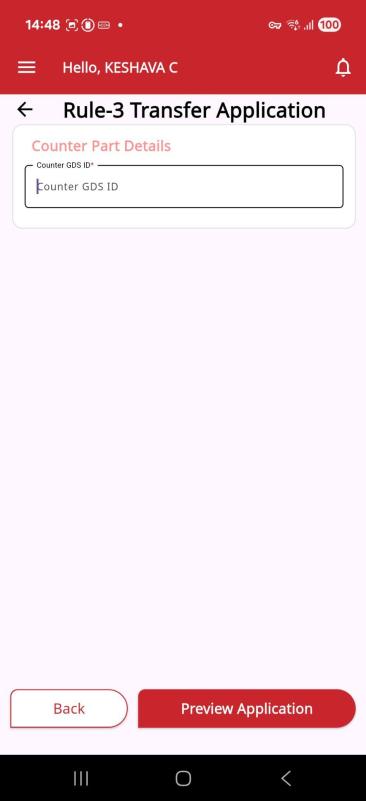
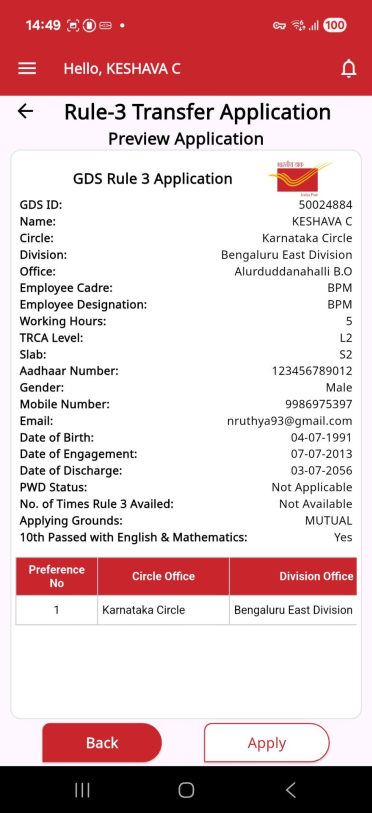
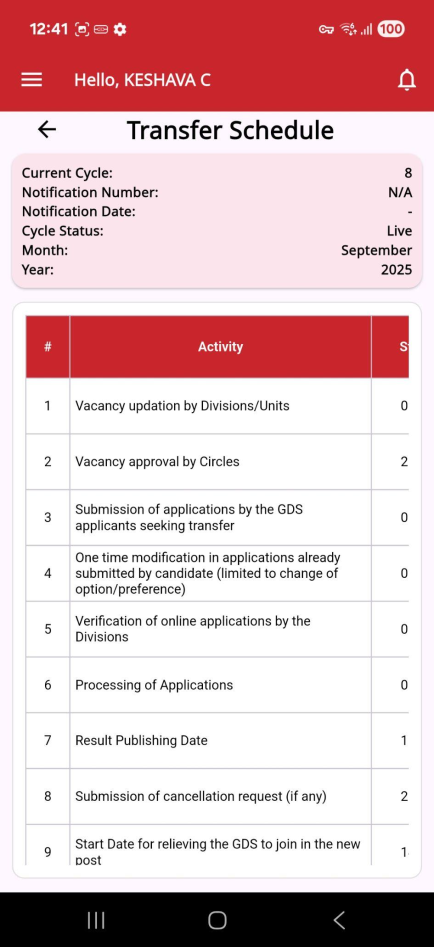
Transfer
Handles transfer request processing and tracking.
Key Functional Steps:
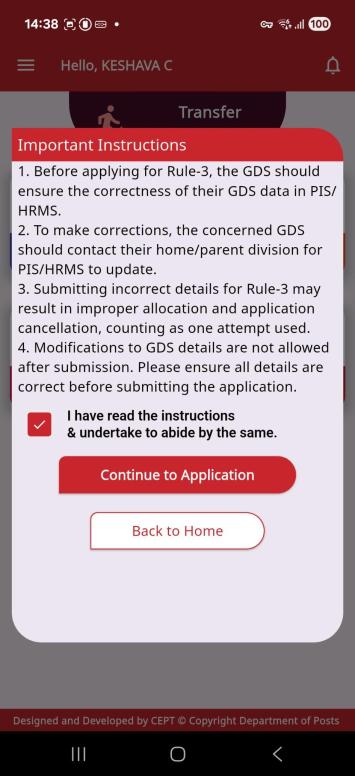
• Apply Rule - 3 transfer.
• Track application status.
• View transfer schedule and important dates.
• Download relevant documents.
Dependency: Transfers are processed only during scheduled windows. Mutual transfer requires valid IDs.




INDIA POST – APT Page 26 of 41




Operational Guide – My Employee Mobile Application
INDIA POST – APT Page 27 of 41
Operational Guide – My Employee Mobile Application



INDIA POST – APT Page 28 of 41
Operational Guide – My Employee Mobile Application




INDIA POST – APT Page 29 of 41
Operational Guide – My Employee Mobile Application Training:
Displays training modules assigned to the user.
Key Functional Steps:
• View assigned training content.
• Redirect to IGOT portal for course access.
Dependency: Full functionality pending due to IGOT integration.

INDIA POST – APT Page 30 of 41
Operational Guide – My Employee Mobile Application Service Desk
Facilitates issue reporting and tracking.
Key Functional Steps:
Step 1: User clicks on "Service Desk" icon from the Home Dashboard
Step 2: Support Desk Dashboard opens with Raise Ticket, Tickets Raised, Reports & Analytics, and FAQ's & Solutions options
RAISE TICKET FLOW
Step 3: User clicks on "Raise Ticket" card
Step 4: User selects Category from dropdown
Step 5: User selects Module from dropdown (enabled after category selection) Step 6: User selects Sub-Module from dropdown (enabled after module selection) Step 7: User enters Problem Description in text field and all mandatory fields Step 8: User attaches documents (Optional)
Step 9: User clicks "Raise Ticket" button
Step 10: Success popup displayed with Ticket ID, user redirected to Dashboard VIEW TICKETS FLOW
Step 11: User clicks on "Tickets Raised" card from Dashboard
Step 12: User clicks on any ticket to view details (Ticket ID, Status, Priority, Routing History, Attached Documents)
TICKET ACTIONS FLOW
Step 13: User clicks "Withdraw" button, enters remarks, and confirms withdrawal
Step 14: User clicks "Submit Additional Information" button when clarification required, enters remarks and submits
Step 15: User clicks "Closure Confirmation" button when resolution provided, confirms closure
Step 16: User clicks "Resolution Not Accepted" button when resolution not acceptable, enters remarks and submits.
SEARCH TICKET FLOW
Step 17: User clicks Search icon, enters Ticket ID, and clicks "Search"
INDIA POST – APT Page 31 of 41
Operational Guide – My Employee Mobile Application REPORTS FLOW
Step 18: User clicks on "Reports & Analytics" card from Dashboard
Step 19: User clicks on "Detailed Report" to view ticket-wise details
Step 20: User clicks on "Consolidated Report" to view summary by status FAQ's & SOLUTIONS FLOW
Step 21: User clicks on "FAQ's & Solutions" card from Dashboard
Step 22: User clicks on any FAQ item to view/download document
Step 23: User clicks Back button to return to Dashboard

Dependency: Tickets follow escalation workflow up to CEPT.
INDIA POST – APT Page 32 of 41
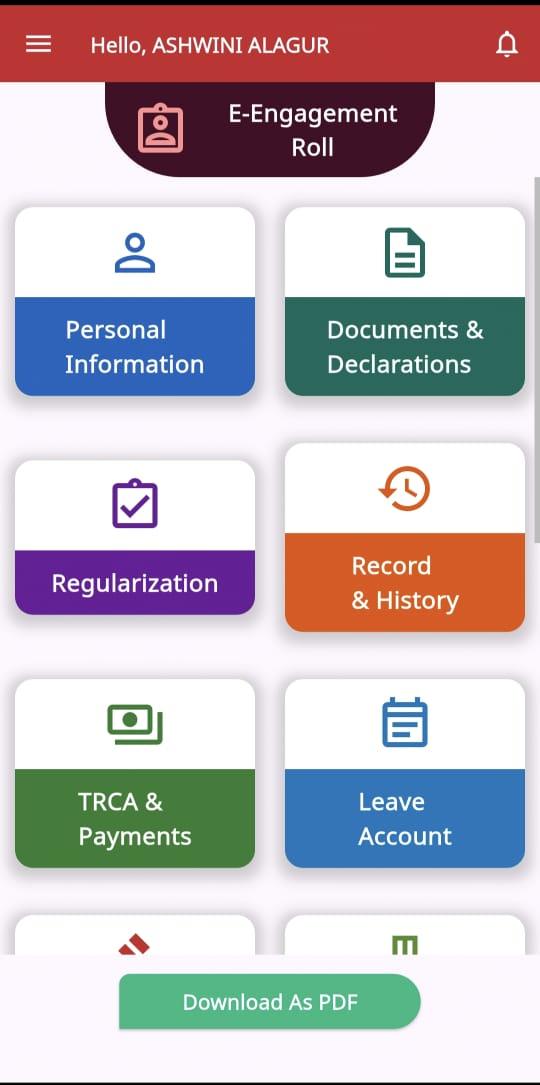
Operational Guide – My Employee Mobile Application E-Engagement Roll
Acts as a digital service book for employees.
Key Functional Steps:
Step 1: User clicks on "E-Engagement Roll" icon from the Home Dashboard
Step 2: E-Engagement Roll Dashboard opens with Personal Information, Documents & Declarations, Regularization, Record & History, TRCA & Payments, Leave Account cards, and "Download As PDF" button
Step 3: User clicks on "Personal Information" card to view employee details (Name, GDS ID, DOB, Designation, Office, PRAN/SDBS Details)
Step 4: User clicks on "Documents & Declarations" card to view/download uploaded documents
Step 5: User clicks on "Regularization" card to view regularization status and history Step 6: User clicks on "Record & History" card to view service history, transfers, promotions
Step 7: User clicks on "TRCA & Payments" card to view TRCA level, payment history, increments
Step 8: User clicks on "Leave Account" card to view leave balance and leave history Step 9: User clicks on "Disciplinary record" card to view any disciplinary records Step 10: User clicks on "Promotion/DPC" card to view any dept promotional history
Step 11: User clicks on "Financial Upgradation" card to view complete financial upgrade history
Step 12: User clicks on "Limited transfer" card to view internal transfer history Step 13: User clicks on "TRCA review" card to view all TRCA history
Step 14: User clicks on "NPS/SDBS" card to view SDBS status and contributions. Step 15: User clicks on "Date of discharge" card to view discharge date of the GDS employee Step 16: User clicks "Download As PDF" button to download complete service book as PDF Step 17: User clicks Back button to return to Home Dashboard.
INDIA POST – APT Page 33 of 41
Operational Guide – My Employee Mobile Application
INDIA POST – APT Page 34 of 41
Operational Guide – My Employee Mobile Application My Points
Displays performance-based points.
Key Functional Steps:
• View current month’s points.
• View current financial year points.

• Booking-related points available (subject to data availability).
INDIA POST – APT Page 35 of 41
Operational Guide – My Employee Mobile Application My Performance Dashboard
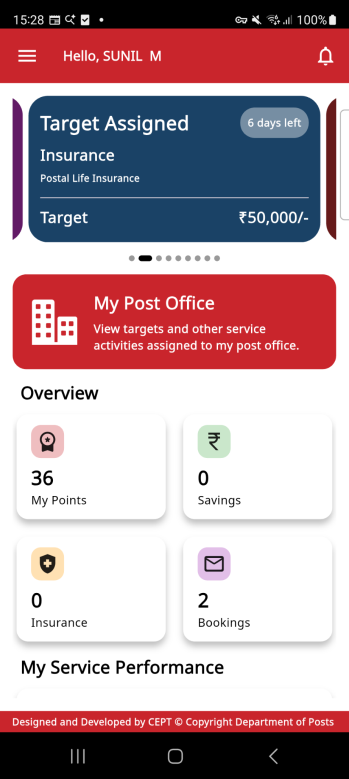
Screen - Performance Dashboard Page:
This screen serves as the main dashboard for the user to monitor targets, track performance, and access key postal service activities.
Target Assigned Card
Action:
User views/swipes card
System Behavior:
Displays assigned target details
My Post Office Card
Action:
User taps "My Post Office"
System Behavior:
Opens post office activity screen
User Can:
● View assigned targets
● Check service activities
● Monitor performance
Overview Section
My Points
Action:
User views points
System Behavior:
Displays earned points (e.g., 36)
Savings
Action:
User views savings metric
System Behavior:
Displays total savings (e.g., 0)
Insurance
Action:
User views insurance metric
INDIA POST – APT Page 36 of 41
Operational Guide – My Employee Mobile Application
System Behavior:
Displays insurance count/value (e.g., 0)
Bookings
Action:
User views bookings
System Behavior:
Displays total bookings (e.g., 2)
My Service Performance Section
Action:
User scrolls down to this section

System Behavior:
Displays list of service categories with reports
INDIA POST – APT Page 37 of 41
Operational Guide – My Employee Mobile Application Screen - My Post Office Page:
● Displays branch post office information (Office ID, Facility ID, Pincode, Employees) ● Provides access to multiple service report modules
● Enables users to monitor operational performance across services
UI Elements:
Post Office Details Card
Action:
User views the card
System Behavior:
Displays post office information
Service Reports Section
Action:
User scrolls down to this section

System Behavior:
Displays list of service categories with reports
INDIA POST – APT Page 38 of 41
Operational Guide – My Employee Mobile Application Notification
Displays all system-generated notifications.
Key Functional Steps:
• View pushed notifications.
• Access stored notifications within the app.

Dependency: Portal integration is pending.
INDIA POST – APT Page 39 of 41
Operational Guide – My Employee Mobile Application ESS Functionality
Displays Employee Self Service features based on role.
Key Functional Steps:
• ESS modules are shown dynamically based on the login role.
INDIA POST – APT Page 40 of 41
Operational Guide – MyEmployee Mobile Application Notes:
INDIA POST – APT Page 41 of 41